
A Design-Led Approach for Software as a Service Implementations
 My previous post described why we should follow a user-first, design-led approach to enterprise software implementation instead of a system-driven approach. Yes, even with modern user interfaces like Salesforce Lightning, SAP Fiori & UI5, Pega, or SharePoint on Office 365. The benefits include saving time and money, easier implementation and roll-out, and satisfied (and happier) users.
This post describes our process, a focused version of Rapid Design & Visualization (RDV), Capgemini’s user-centered design methodology.
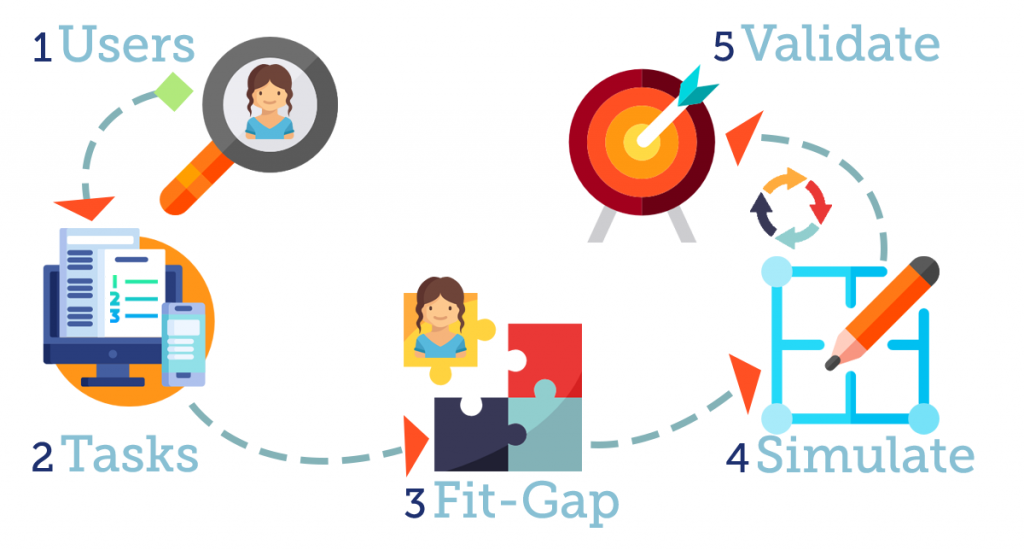
In a full-fledged user-centered design process, user research can take a lot of time, and it has its place in custom development. For SaaS or package implementations, we focus on how UX design can make the software work for users, not the other way around. We go through the following steps:
- Identify users and their needs
A user-first approach begins with an understanding of the users. Through interviews with stakeholders and actual users, we get a clear understanding of the distinct user groups and their needs from the software. This includes what triggers their use of the software (e.g. call, email), and what actions they take after using the software. We begin seeing trends in what users do as well as how they do it. - Analyze and prioritize tasks
SaaS software solutions simplify standard processes by breaking them into smaller pieces, sometimes in the form of standalone tasks. This replaces the traditional everything-but-the-kitchen-sink interface, which overwhelmed users with every possible option. During this step, we work with user groups from the previous step to identify the tasks they do, and prioritize these tasks based on frequency, importance and criticality. This prioritization identifies which tasks need most attention and focus. - Match user needs to software capability
Armed with information about users and their prioritized tasks, we conduct workshops with users and stakeholders to identify gaps in how the SaaS handles a business process or tasks. Focusing on how we can modify the software design to meet users’ needs, we make decisions of using the software:
(a) as-is out of the box,
(b) with enhancements to the User Interface or functionality OR
(c) custom screen designs.
This is a delicate balance, keeping in mind the impact of customization on future upgrades. - Simulate the future state
We rapidly create high-fidelity prototypes of enhancements and customs screen designs incorporating the look and feel, requirements from the previous steps, design standards and patterns, as well as user experience and usability improvements. Prototyping tools help with a quick turnaround instead of spending much more time going under the hood of the software. By separating design from implementation, we can focus on design before starting any development, and changes are quicker, easier and less expensive to make earlier in the process. - Validate and Iterate
The last step is to review the prototypes of the enhanced or customized designs with users and stakeholders to make sure it meets their needs. If there are tweaks needed, we can often make the changes during the review, while bigger changes are done after the review and can be shared for sign-off, often by the following day. After sign-off, the designs are handed off to the technical team for implementation.
We repeat these steps until we have addressed all the enhancement and customization design for the software being implemented.
In the final post in this series, we will dive deeper into rapid visualizations, a cornerstone of Rapid Design & Visualization, and the role it plays in enhancing or customizing the design of SaaS solutions.
Credits: Illustration by India Irby
Leave a Comment